Showing posts with label Jo. Show all posts

Sunday 12 August 2012

So Happy Together Collection

Today's post is brought to you by Design team member Jo who has been creating with the gorgeous So Happy Together collection.

***  ***  ***

SO HAPPY!!! .... That's exactly how I felt when the So Happy Together range from Echo Park arrived on my door mat.  Having the perfect photos was also a bonus!

In the first layout I used criss cross paper as the base, Garden as a photo mount, a strip of Neighbour, small amounts of happy stripes and jot it down and finally patchwork.

I inked all of the edges in black to make them pop off the white cardstock.  The hexagons on the Patchwork paper were cut into patterns and everything was layered up.


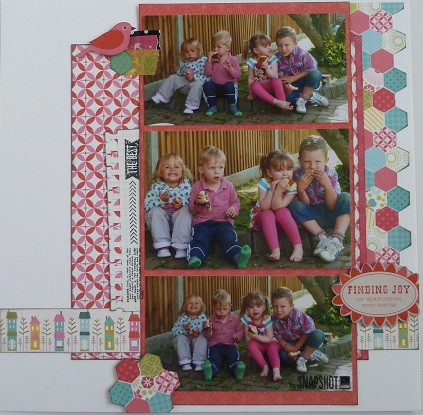
I attached a couple of the stickers from the coordinating sheet using pop dots.


And finished the whole thing off with some stamping and washi tape.


Although I love the bright colours of these papers I know they're not everyone's cup of tea so I thought I would also do a layout to really highlight the B side of these papers.


I thought the B side of Diagonal Dot would make the perfect background for this picture.  I also used Garden, Jot It Down and Patchwork.  All of the edges were inked in brown and the two different sizes and fonts on the alpha sheet were perfect for the title.  To anchor the strips of paper in the diagonal corners I cut one of the flowers from the element stickers almost in half. The cute banner strip is also one of the element stickers.

This really is a great collection to work with whether you like bright, bold colours or if you prefer a more muted scheme.

Don't forget you can buy the whole collection on Special Offer, saving over £3.60 on the individual rrps!!!

Thanks for stopping by today!

Jo x

Monday 5 March 2012

Playing with Paint!!

For the second post in our "How to .... " series, DT member Jo has been having fun with paint and come up with some fab ideas for using paint dabbers

If you missed the first "How to....." post which was all about border punches, it's here!

Over to Jo.....

I have always loved playing with paint .... long before I found scrapping I was playing with paint!! I was delighted when Sarah asked me to come up with some ideas for using the Jenni Bowlin Paint Dabbers. I love the these paint dabbers because they never seem to clog or dry up so they're always ready to use. All my projects in this post use the "cough syrup" dabber.


First of all I created this layout:


I used the dabber over a mask to create the circles on the cardstock.


I used the dabber to colour some patterned paper shapes. I think most of us have some pattern paper that has writing or newsprint on it, well the shade I had didn't fit with my page so I changed it. The paints aren't thick enough to totally hide the print which is perfect.


For my "Lillies" layout, I really went to town with the paint, emphasising the beautiful colour of the flowers in my photo.


I used the dabber to ink the edges of the pattern paper and cardstock and coloured the chipboard flowers and Thickers letters for the title. 


I applied the paint, direct from the dabber, to get this lovely finish on the plain butterflies.


You can also use dabbers to create little paint splatters by unscrewing the lid and use a paintbrush to pick up a little paint which you can then gently "flick" onto your page. Using the non brush end of the paintbrush you can "dot" the paint on your cardstock. Paint dabbers are also great for stamping because they add a tiny bit of texture, you just apply them in the same way you would ink as I have done with this woodgrain stamp!


If you have some embossing folders then you can create this great effect simply by using the paint on one side of the folder prior to adding the paper and embossing through your die cutting machine. be sure to thoroughly clean the folder afterwards though!


If you're on a budget and trying to do some stash busting then these dabbers really are a great investment. How many of us have blooms and ribbons lying around, unused and maybe not even in the colours we want? You can easily customise them with paint dabbers.


I've just used the dabber on just half so that you can see the great coverage they give.

I hope this has given you a few ideas for using the Jenni Bowlin Paint Dabbers which are available in the S J Crafts shop ... here!!

Tuesday 14 February 2012

"A Fun Day" Tag Book!!

Have you seen these packs of Ranger Tags ? They are great for adding to layouts for journalling or how about decorating them "Tim Holtz" style or add some small photos and create a tag book?

I sent DT member, Jo a few tags and an envelope of stash and here's what she did with it all!!


Jo has recently celebrated a special birthday and she made this super cute tag book to record the fun day that she had, celebrating with her friends and family!


Jo explains how she made it together with pictures of each page!


The blue glittered border on the MME Lost and Found 'Fun Day' title just didn't seem to work with my other colours so I cut the sentiment out and just used that. 


I used the Lost & Found label stickers as accents and layers rather than labels, I think it's a great way to use up the labels that have a sentiment on them that you know just won't go with anything else you have.


I inked all the tags with vintage photo distress ink.


I LOVE swirls and the Sweet "Sweet" one was too nice to use on just one page so I cut it up and used a piece on each tag.
I also added some pearls and crystals to most of the pages.


Once all my pages were done, I fastened all the pages together with some twine!

The tags are also available here in a slightly bigger size!

To see more of Jo's craft projects, pop over to her blog.

If this post inspires you to make a tag book, leave us a comment and a link on this post as we'd love to come and see it!

Wednesday 5 October 2011

More Crate .... from the leftovers!!!

Are you the type of scrapper who carefully tidies up after each layout before starting on the next page or do you see what else you can make from the bits of paper and embellishments left on your craft table?

 This evening I want to share with you Jo's second layout which shows how easy it is to make a second layout just by using up whatever is left on your desk.


Jo used strips from the offcuts of the curtains and pattern papers that were used on the first page to create a matt for her photograph.


Next, a few carefully selected chipboard pieces ~ again from the same chipboard sheet as used on the previous layout create the title and some Crate stickers and chipboard accents are layered up to give dimension. Some of the stickers can be cut and just use half (another way to make your stash go further!). I love how Jo has clustered her embellishments to the top right of her page to balance the little "stinkin' cute" sticker on the photo.

If you feel inspired to use up whatever is laying on your desk next time you scrap, why not leave a comment here as I'd love to come and see!

Crate Random Collection ~ By Jo

Today I'd like to share with you the first of the layouts created by Design Team member Jo using  Crate Paper's Random collection.

I am delighted to have Jo on our new Design Team and 'm sure you'll agree she has done a fantastic job with her first box of DT stash!

I love this "Sweet and Adorable" layout ~ just look at that cute smile!
The photo didn't actually have a lot of colour in it but by layering up the patterned papers Jo has added lots of colour and fun to the page.


The chipboard accents add lots of dimension and interest and make a handy title too!

Jo said "I used plenty of the chipboard die cuts on this page, layering them up. The amount of chipboard die cuts on the sheet make them excellent value!"


All the edges have been inked with distress ink, a great technique for bringing the different elements of a layout together.


Jenni Bowlin tiny alpha stickers add the details of the photograph.

I'll be back later to show you Jo's 2nd page but in the meantime if you want to see more of her amazing work, pop over to her blog.